Settings
Theme
- Go to Admin >> Settings >> Theme
- Theme color of software can be changed from "Setup Theme Option". As of Now Eight themes are available Black & White, Blue, Dessert, Green, Maroon, Purple, Yellow and Light Purple. Applying any theme will be applicable to Admin/RM/BM/Customer Logins.

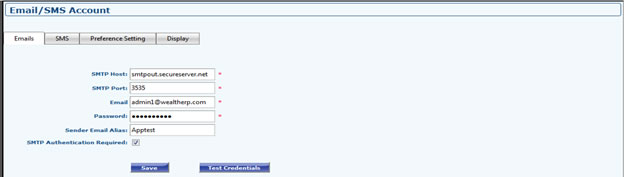
Email/SMS Account
- Go to Admin >> Settings >> Email/SMS Account
- Advisor can send Mutual Fund Reports, Equity Reports, Financial Planning Reports, Customer Logins, Staff Logins etc to the customers/staffs. To send a report from Advisor's own email id first SMTP needs to be Setup. Please get the information of SMTP Host, SMTP Port from your email service provider, fill your email id and password then click to Test Credentials. It will validate if the information provided by you is correct or not. Once it will be validated please click to "Save" button so that this Email id can be used for all your communication with Customers
Note:- Make sure "SMTP Authentication Required" checkbox is checked as shown in below image.
- Here are some commonly used email service provider's SMTP details.

Environment
- Go to Settings >> Environment
- Environment Setting can be used for two purposes. Here you can enable/disable IP Authentication and Ops Role
- To know about IP Authentication Enable/Disable please refer next section
- To enable Ops Role first Click to Checkbox to Enable Ops Role. It will pop up a warning message and will ask to add a Ops Staff if you have not added earlier

IP Pool
- Go to Settings >> IP Pool
- Note: IP Pooling Setup is recommended if you have Static Internet IP Address. This function won’t be useful for dynamic internet IP’s.
- Setup IP Pool: First Enable IP Pooling by Clicking on Checkbox on Environment Settings.
- Enter your IP and click on submit button

Setup customer Category
- Go to Admin >> Settings >> Setup customer category
- Setup customer category is used to categorize your customers. Each category of customer is given a category code

Repository Category
- Go to Settings >> Repository Category
- Repository category is used to give access to the various categories. The data uploads can be done under admin>>content>>repository

Associate Category
- Go to Admin >> Settings >> Associate category
- Associate Category is Prerequisite step if you want to categorize your associate branches. Here you can Add/Edit/Delete categories which will be available in Associate Category dropdown during adding an Associate Branch. After filling category code and category description please click “Save” button.

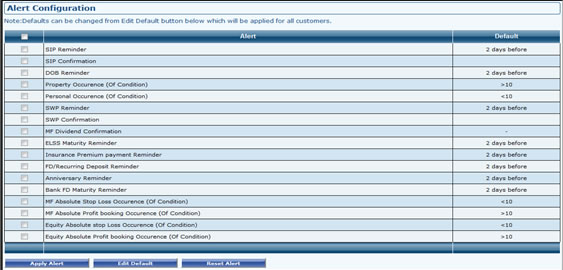
Alert configuration
- Go to Admin >> Settings >> Alert configuration
- "Alert Configuration Setup" Can be done by Admin which will be applied to all Customers. Birthday reminder, Maturity Date reminder, SIP Reminder, SIP Confirmation, Anniversary Reminder etc can be set from "Alert Configuration" Screen as shown below. To Edit any reminder just select the Alert from Screen and click to Edit Default and Change accordingly. After any change click on Apply Alert.
Content
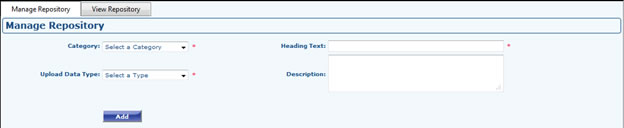
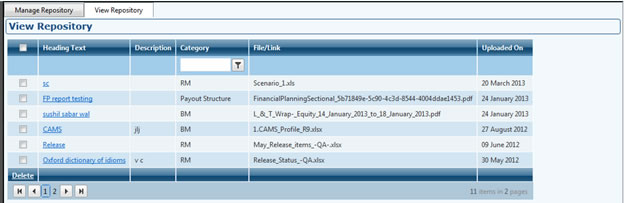
Repository
- Go to Content >> Repository
- How to upload a link/file in repository?
Organization
Profile
- Go to Admin >> Organization >> Profile >> edit profile
- Clicking on Edit profile will open a edit form there you can change or update organization profile information. You can change or upload a new logo by clicking on "Click To Change Logo" link. Select box will open, select the logo and click to Submit.

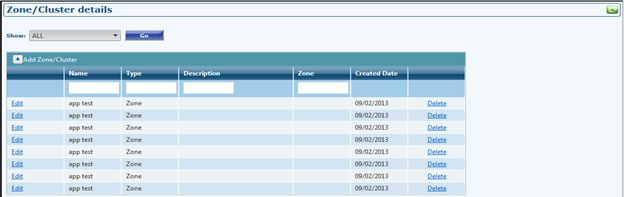
Zone/Cluster
- Go to Organization >> Zone/Cluster
- For large organization you can add Zones and clusters under it.
Staff
- Go to Organization >> Staff
- Here you can view all your current staff
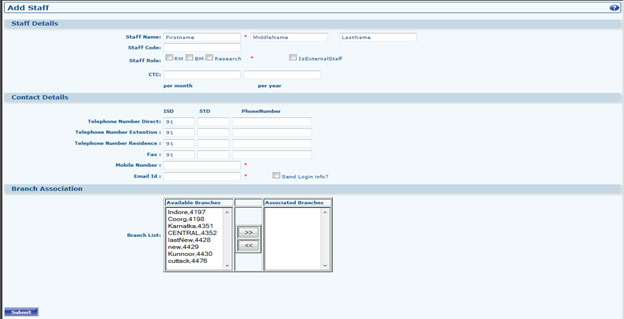
Add Staff
- Go to Organization >> Staff >> Add Staff
- Fill all the required information in fields given in Add Staff Form. Here you can select Staff Role if he is Internal RM, Branch Manager, External RM and External Branch Manager.
- Staff Role RM: If staff is Internal RM, just select staff role as RM. If staff is External RM then Select the Check box "Is External Staff". For Internal RM only Internal Branch will be displayed in Branch Association Gird Below. For External RM only Associate Branches will be available to be associated in Branch Association Grid Below. As an internal RM can be associated only to Internal Branch and External RM can be associated to Associated Branch Only. Select the Branch where this Staff is associated.
- When Ops Staff will login below tree view will be shown. Ops can send all reports, business MIS, can navigate to any customer's module. Ops Staff can handle all the uploads and account management.
- Staff Role Branch Manager: If branch manager is also acting as Internal RM select RM if Branch Manager is External RM then select "Is External Staff". Select the Branch Associated to that Branch Manager from Branch Association Grid.
Branch/Association
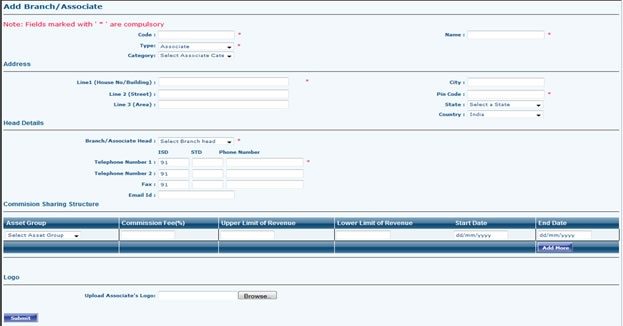
Add Branch
- Go to Organization >> Branch/Association >> Add Branch
- If Branch is an Internal Branch: Fill the form and Submit

- If Branch is an Associate Branch: Select Associate Category (If you have not created associate category then please first Add Associate Category). Setup Commission Sharing Structure, Upload Associate Branch Logo.
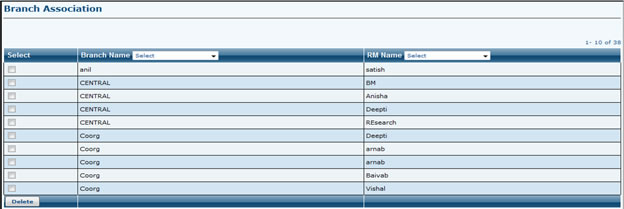
View Branch Association
- Go to Organization >> Branch/Association >> View Branch Association
- Here you can check which RM is associated with which branch.
LOB
- Go to Organization >> LOB
- Permission to Add Lines of Business is given to Super admin. As you can see in below screen Admin can only Edit/View or Delete LOB details.
Note: For Reject Reason Broker Code Not Found. Edit Mutual Fund LOB Entry and Add Variation.

Customer/Prospect
Customer List
- Go to Customer/Prospects >> Customer list
- Customer/Prospect Grid shows all the customers or prospect under all the RM's. Customer Grid is a Key Grid which can be used for many purposes. You can filter all the Customer or Prospects assigned to any particular RM by Assigned RM filter Dropdown. Is Prospect Filter shows you how many customers are real customer and how many are prospect customers. By applying Group filter on any name shows all the associated members of that particular group head.
- From this grid you can also navigate to Customer's Module. By selecting options profile dashboard, portfolio dashboard, financial planning, alerts you can navigate to that customer's module. First column dropdown also has Delete option to be selected which will delete the selected customer if customer is not associated to any other customer or does not have any details in his profile or portfolio
- All the customers can be Exported by clicking on Export icon on right top corner. Paging gives you flexibility to navigate to any page at any instance. Customer can be searched by Search Box

Add Customer
- Go to Customer/Prospects >> Add Customer
- Two types of Customers can be added
- Individual Customers
- Non Individual Customers (Banks, Trust etc.)
- Select customer type, Select Branch, Next dropdown will display all the RM's associated to selected Branch, Select Customer Sub type, PAN No., Name, Email id and click to Submit for Quick Add. If you want to add other Profile info also click to "Save and Add Details" Button. There you can fill Customer address, Proof, Bank Details Etc.

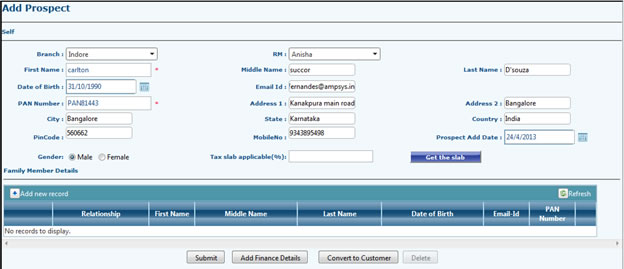
Add Prospect
- Go to Customer/Prospects >> Add Prospect
- Add Prospect option is available for RM logins. RM can add a Prospect, Fill all the details and click to Submit. After submit prospect will be visible in RM / Admin Customer Grid. Family Members / Associates will not be visible in Customer Grid.
- Prospect can be converted to a Customer from Convert to Customer Button. But RM does not have permission to convert a prospect to customer. Only Admin has permission to convert a prospect to a customer.
Manage Portfolio
- Go to Customer/Prospects >>Manage Portfolio
- Customer can have multiple portfolios. As soon as we create a customer "My Portfolio" is created by default. But another portfolio can be added from Add customer portfolio Screen. Similarly, portfolio can also be deleted.

Add Portfolio
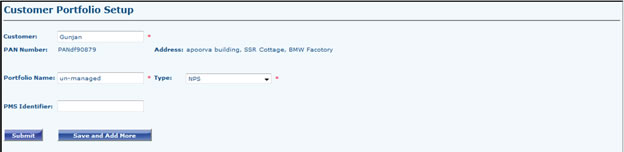
- Go to Customer/Prospects >>Manage Portfolio >> Add Portfolio
- Add New Portfolio: Select any customer name by typing customer name in Customer Field, PAN no. and Address associated with that costumer will be displayed below. Now give a name to new portfolio, Select Type of Portfolio, If its PMS, fill the PMS Identifier No. in below field and submit.
Customer Grouping
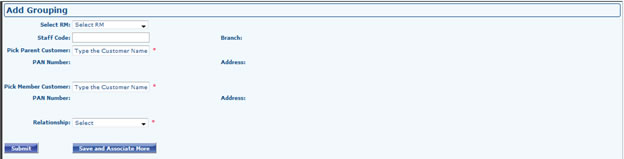
- Go to Customer/Prospects >> Customer Grouping >> Add Grouping
- Go to add option, Group Account Setup form will open. Now Select RM name, Staff Code and Branch will be displayed for selected RM, Now Type Some later in "Pick Parent Customer" Field a customer list belongs to selected RM will open matching the word you have entered select the Customer name that you want to make Parent. As soon as Parent customer will be selected PAN Number and Address Associated with that Customer will be displayed below.
- Now type customer name in "Pick Member Customer" Field, choose the Member customer name from search result dropdown as shown below. Now Select the relationship from Relationship Dropdown.
- Note:
- Once Group Account is setup, Associated Members will be displayed to be selected as Nominee, Joint Holding Members, and Co-Borrowers etc. in other Places.
- If any member once selected as Parent Customer it will not be available in Member Customer list. So Parent Customer cannot be a Member Customer for any other parent customer.
- Member associated with any Parent can never be a Parent Customer.
- Once a Customer is Associated to any Parent Customer he/she cannot be associated to any other Parent Customer.
- Disassociate Group Account: Now if you want to de-associate any member ship then simply search parent customer select the Parent Member Combination for which you have to de-associate the relationship and click on the “Disassociate” button as shown below

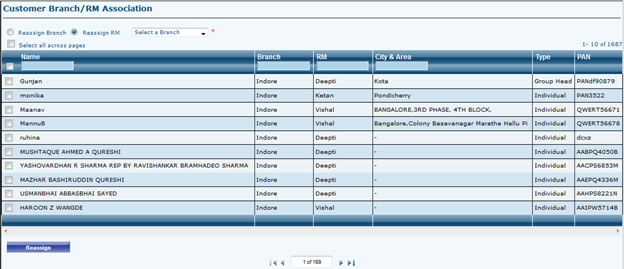
Associates
- Go to Customer/Prospects >>Associates
- Association: You can reassign any Customer’s Branch or RM from this UI.
- Reassign Branch: To Reassign Branch first Select Radio Button as Reassign Branch, Now select customer whose Branch is need to be reassigned. Now Pick a Branch from Below Dropdown and click on “Reassign”. If Selected Customer is assigned to a RM which is not associated to your selected Branch then system will ask you to change RM also. It will display RM dropdown of all RM associated to that Branch.
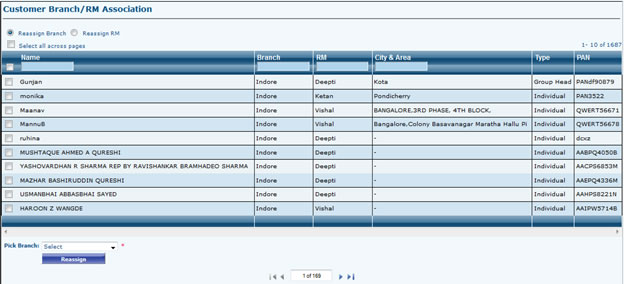
- Reassign RM: To Reassign Branch first Select Radio Button as Reassign Branch, Now select customer whose Branch is need to be reassigned. Now Pick a Branch from Below Dropdown and click on “Reassign”.
FP Offline Form
- Go to customer/ Prospect >> FP offline form
- If you want to save the form click export to PDF and then save the file.

- If you want to send the form by e-mail then click View & e-mail then click send by email.

Reports
- Go to customer/ Prospect >> Reports
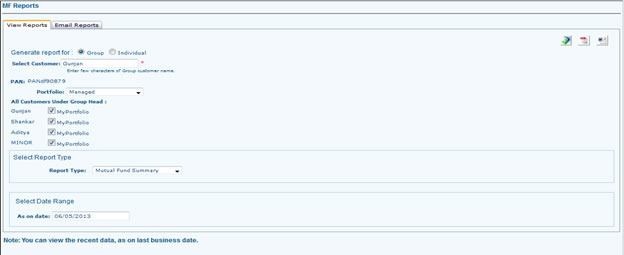
MF Reports
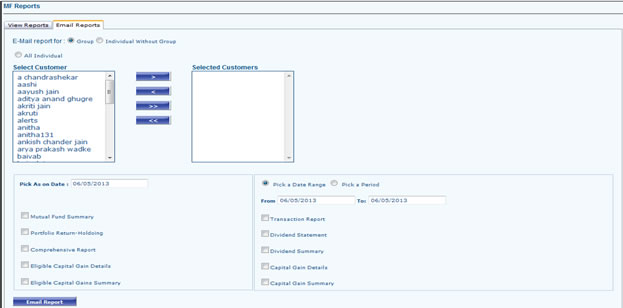
- Mutual Fund Reports can be Viewed, Downloaded & Sent by Email in PDF format. As you can see the below screenshot, here Group Selection shows all the Group Customer Reports.
- Bulk Mail Feature is also available for Mutual Fund Reports. Here you can send multiple Mutual Fund Reports to Multiple Customers in just one Click. As shown in below screen shot there are three selections, Group Selection shows all Group Head Customers who will get his associates report also if chosen, Individual Without Group selection shows all Customer who are not associated to any customer with any relationship, All Individual Selection shows all the customers and they get their individual reports
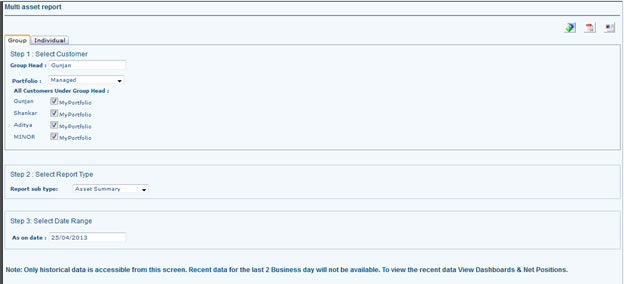
Multi Asset Reports
- Multi Asset Report can be Viewed, Downloaded & Sent by Email in PDF format. As you can see the below screenshot, here Group Selection shows all the Group Customer Reports.
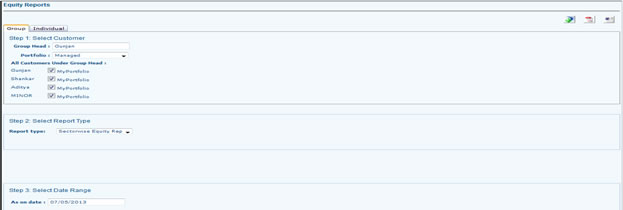
Equity Reports
- Equity Report can be Viewed, Downloaded & Sent by Email in pdf format. As you can see the below screenshot, here Group Tab shows all the Group Customer Reports
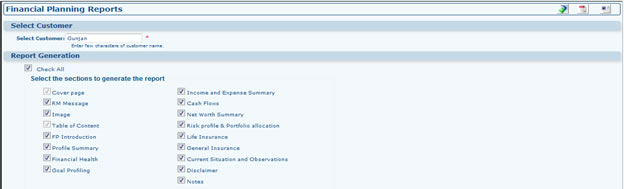
FP Reports
- FP Report can be Viewed, Downloaded & Sent by Email in PDF format. As you can see the below screenshot, here Group Tab shows all the Group Customer Reports
Order
Add Order
- Go to Order >> Add order
- Here you can order mutual fund or life insurance for a particular customer

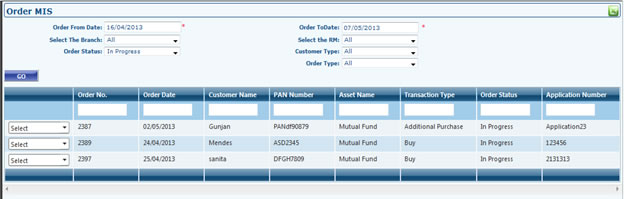
Order MIS
- Go to Order >> Order MIS
- Here you can view the order MIS by specifying a time period.
Operations
Uploads
Start Uploads
- Go to Operations >> Uploads >> Start Upload
- Here you can upload all your files.
- After the cleansing process is done, upload the profile file on the software.
- Step1: Select the Extract type, Branch and External Source
- Step2: Click on “Browse” button
- Step3: Select the file you wish to Upload
- Step4: Click on “Upload” Button to start upload

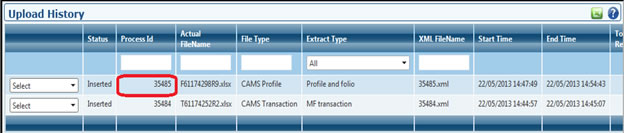
Upload History
- Go to Operations >> Uploads >> Uploads History
- After the upload is done, check your upload history

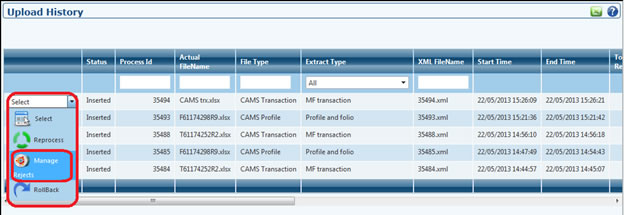
- If the PAN number doesn’t exist then type the PAN and hit the “Save” button, if the customer exist then do the mapping by pressing “map to customer button” and finally reprocess.

View Exceptions
- Go to Operations >> Uploads >> View Exception
- Here you view all the exceptions.

Reconciliation
Profile Reconcile
- Go to Admin>> Operation >> Uploads >>uploads history
- Make a note of the process id.
- Go to Admin >> customer/prospect >> customer list, and search the same process id and check the count for that particular process ID.

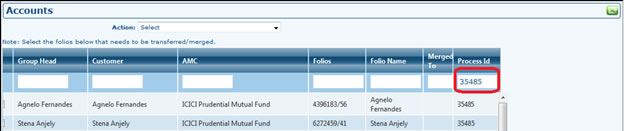
Folio Reconcile
- Go to Admin >> Operation >> Uploads >>uploads history, make a note of the process id.
- Go to Admin >> Queries >> Account, and search for the same process id and check the count for that particular process ID.
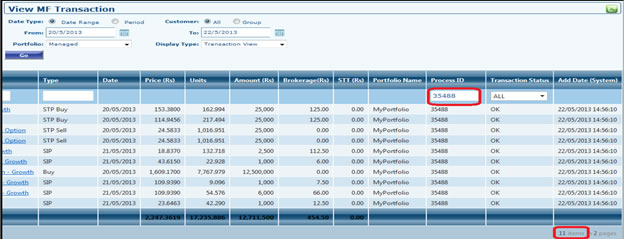
Transaction Reconcile
- Go to Admin>> Operation >> Uploads >>uploads history
- make a note of the process id.

- Go to Admin >> Queries >> Transaction
- Click on MF Transaction and search the same process id and check the count for that particular process ID.
User Management
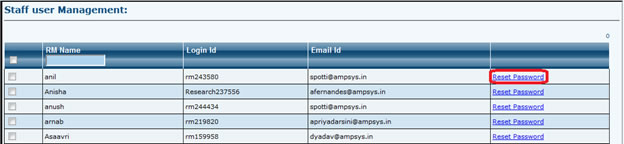
Staff User Management
- Go to admin >> operation >> user management >> Staff user management
- For staffs, you can disable their account by just resetting the password but not sending the credentials to them. If they want the password to be changed and shared with them then you can reset and send via automated mail to the staff.
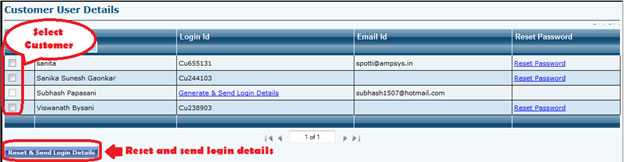
Customer User Management
- Go to admin >> operation >> user management >> customer user management
- For a new customer you can generate and send login details to the customers email id
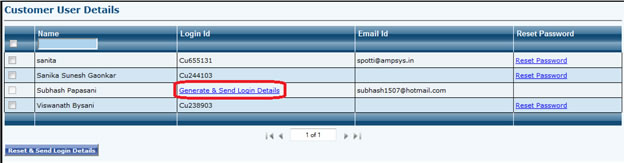
- In case a customer forgets password; the admin can select the customer and click on “Reset and send login details” button.
Login History
- Go to Operations >> User Management >> Login History
- Gives a list of user with date and time of login.
Valuation
- Go to Operations >> Valuation
- Here you can do manual valuation, Select valuation type and date.

Note:
- Mutual fund valuation will affect all the Mutual Fund Net Position with the Current Value.
- Equity valuation will affect all the Equity Data with the Current Value.
- Financial Valuation will affect all the Asset's Data with their Current Value
Add Transaction
- Go to Operations >> Add Transaction
- Here you can add multiple equity transaction

Business MIS
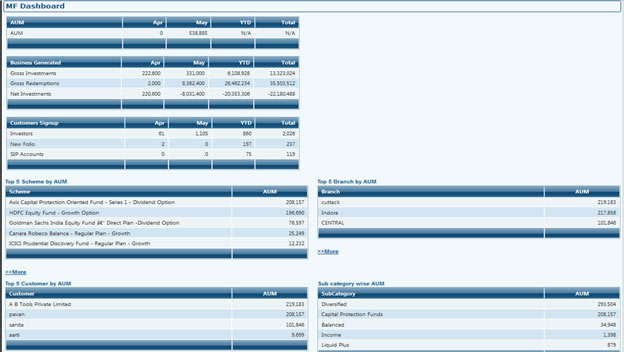
MF Dashboard
- Go to Business MIS >> MF Dashboard
Turnover
- Go to Business MIS >> Turnover

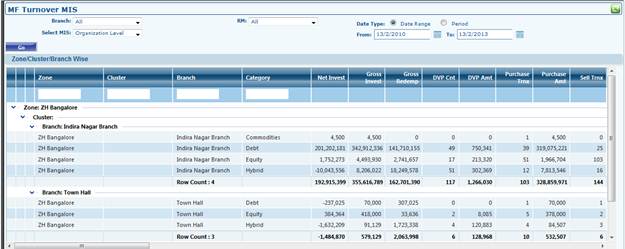
MF Turnover
- Go to Business MIS >> Turnover
- Here we can view the Mutual Fund turnover MIS based on various criteria like branch, RM, Date Range etc.

EQ Turnover
- Go to Business MIS >> Turnover
- Here we can view the Equity turnover MIS based on various criteria like branch, RM, Date Range etc.

Commission
- Go to Business MIS >> Commission
- Here you can view the MF Commission MIS at different levels: organization level, AMC/Folio/Type Wise and category wise

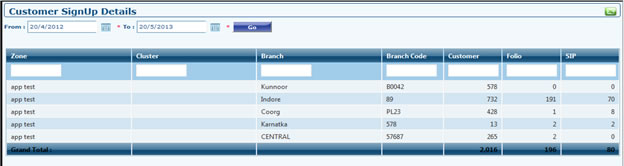
Customer Setup
- Go to Business MIS >> Customer Setup
- Here you will get the customer sign up details.
- For folio count the folio created date is considered
- For Customer Count the customer profiling date is considered
- For SIP count the SIP start date is considered
AUM & Holdings
Customer AUM
- Go to AUM & Holdings >> Customer AUM
- Here you can view the AUM of all the customers or of a particular customer

Customer Holding
- Go to AUM & Holdings >> Customer Holding

Mutual Fund
- Here you can view the MF AUM MIS. AUM is available AMC Wise, Scheme Wise or Folio Wise.

Life Insurance
- Life Insurance MIS can be viewed for all the customers or a particular customer.

General Insurance
- General Insurance MIS can be viewed for all the customers or a particular customer.

Fixed Income
- Fixed income MIS can be viewed for all the customers or a particular customer.

Branch AUM
- Go to AUM & Holdings >> Branch AUM
- Here you can get branch wise AUM

Queries
Accounts
- Go to Queries >> Account
- Here you can view the transaction customer wise, AMC wise, folio wise etc.

Transactions
- Go to Queries >> Transactions

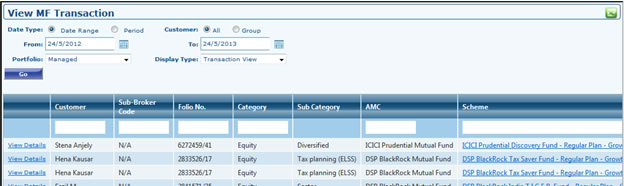
MF Transaction
- Here you can view the Mutual fund transaction of all customers or a particular customer.
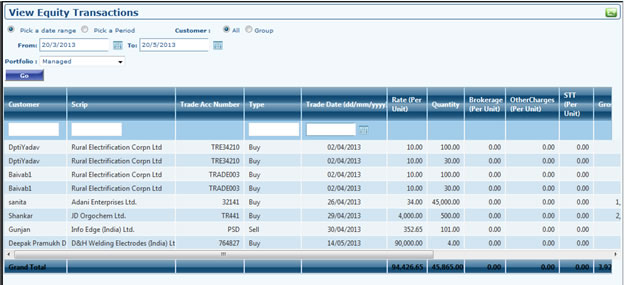
EQ Transaction
- Here you can view the Equity transaction of all customers or a particular customer.
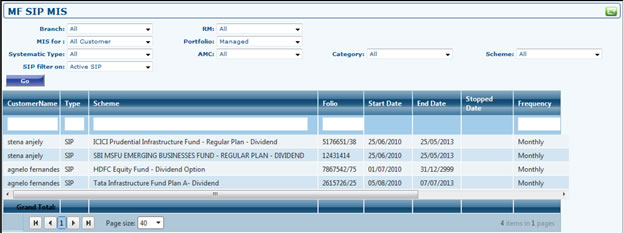
MF SIP MIS
- You can view your mutual fund SIP's here
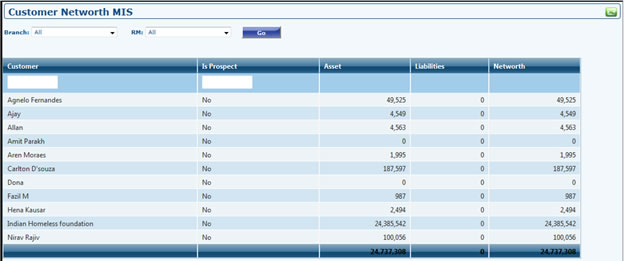
Net worth
- Go to Queries >> Networth
- Here you can know the total net worth of a customer Branch wise and RM wise
Goals
- Go to Queries >> Goals
- Here you can view the Goal MIS of all the customers or a particular customer or all the customers based on goal type etc.

Returns & Analytics
Asset Allocation MIS
- Go to Returns & Analytics >> Asset Allocation MIS

Equity Allocation
- Go to Returns & Analytics >> Equity Allocation
- Here you can view the equity Allocation Company wise or scheme wise.

Return
- Go to Returns & Analytics >> Returns

MF Return
- Here you can view MF Return customer wise or scheme wise.

EQ Return
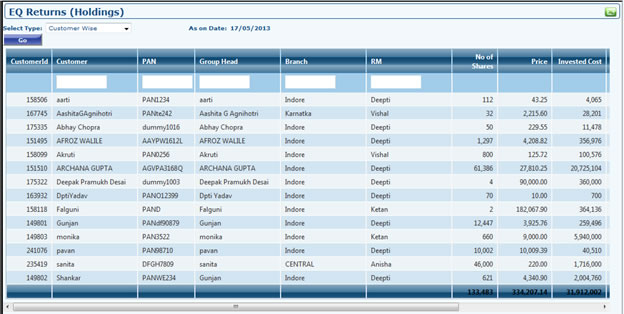
- Here you can view EQ Return customer wise or company wise.
MF SIP Projection
- View the MF SIP Projections here for a particular customer or all the customers.

Message
Compose
- Go to Message >> Compose
- Here u can send message to the customers, RM, BM etc.

Inbox
- Go to Message >> Inbox
- All the mails received will be stored in the inbox.
Outbox
- Go to Message >> Outlook
- All the send mails will be stored in the outbox.
Customized SMS
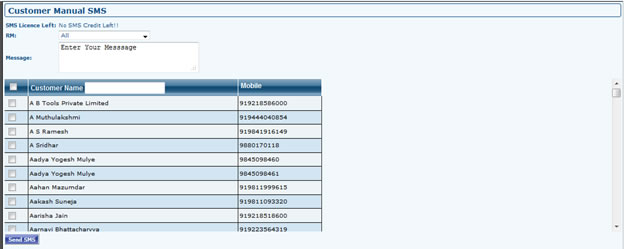
- Go to Message >> Customized SMS
- Select RM, it will show all the customers under that RM, Enter Message in message box, Select Customer and Send
Note: Please note that only customer's with Mobile no. in profile will be displayed here.
Grid with new features
- There are some new features provided in the grid :
- Sorting ( Ascending, Descending, clear Sorting
- Grouping/Ungrouping
- Hide/Un-Hide , unwanted columns
- Relocate the Column of the grid, according to your requirement.
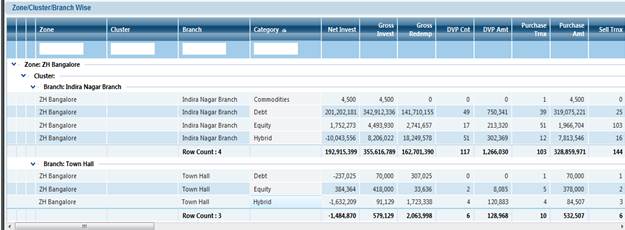
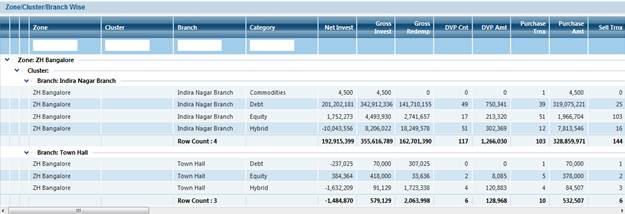
For Example: we will take MF Turnover MIS Screen , to explain these new Features of The Grid.
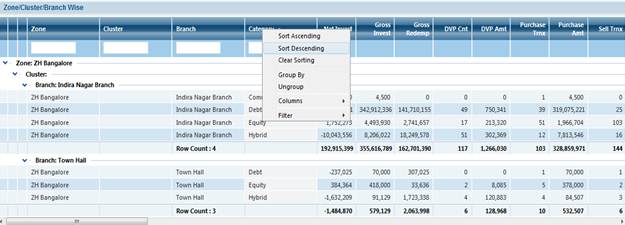
Sort Ascending
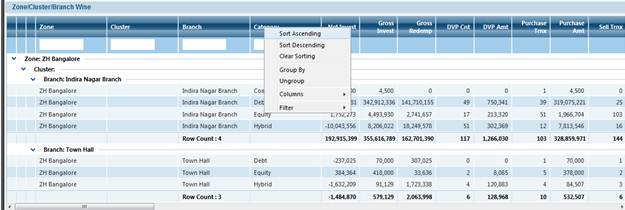
Step 1: Right click on any header.
Step 2: Select “Sort Ascending”
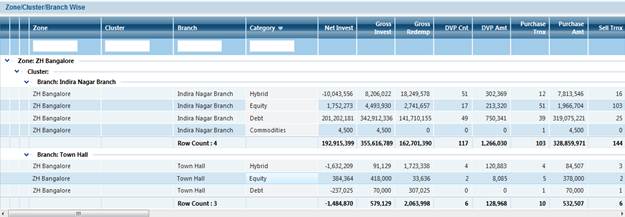
Sort Descending
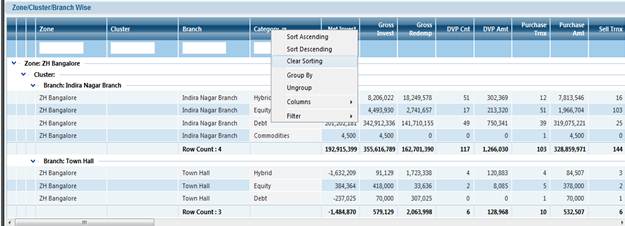
Clear Sorting
Grouping/ Ungrouping

 
Now, you can see that the Grouping is removed from the “zone”

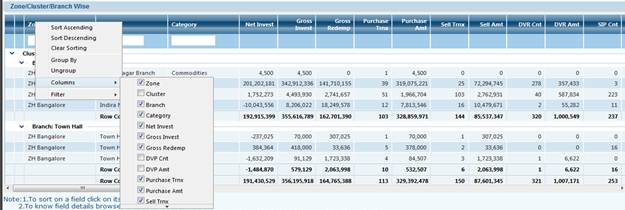
Hide/Unhide Columns

Step 1: Right Click on header
Step 2: Click on option “Columns”
Step 3: Un tick all the columns which you don’t want to see in the grid.
Step 4: to scroll down, put the cursor on the Upward arrow button , present at the bottom of the options
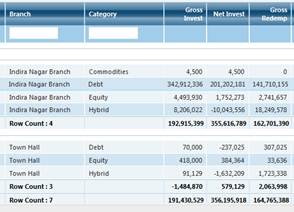
Un tick Cluster , DVP Amt & DVP Cnt
Cluster, DVP Cnt & DVP Amt is get hide.
Relocating the columns
Step 1: Drag the column header you want to relocate
Step 2: Drag to the place where you want to put that header , in the middle, left , right side of any column of that grid.


How to edit customer profile?
- Case 1: Edit Customer Profile: - Go to customer profile then click to Edit Profile. Edit the required information including PAN, DOB, Family associations, bank details, Correspondence address, Permanent address, Office address, Contact Details TABS and click to update. To get Tax Slab it’s mandatory to fill your income first in your Finance Profile Section, according to your income Tax Slab will be displayed after clicking to Get Tax Slab button.

How to add Bank details?
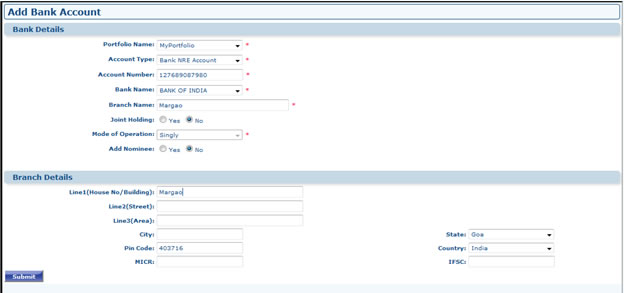
- Go to Profile Dashboard >> Bank Details >> Add Bank Details. Fill all the required information then click on submit.
How to add bank transactions?
- Go to Profile Dashboard >> Bank Details >> Add Bank Transaction/Balance. Select the Account no. /Bank name and select one option then enter Holding Amount then Submit. If you fill the first one then only second one will appear.

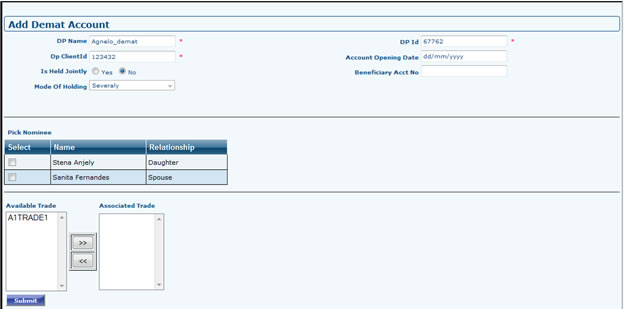
How to add Demat Account?
- Go to Profile Dashboard >> Demat Account Details >> Add Demat Account. Fill all required fields, Nominees and Joint Holder Grids will come only when "is jointly held" is selected as "Yes". Nominees & Joint Holder Grid will not appear if group account is not setup. Available Trade grid will show all trade done by customer which can be selected and associated with Demat account.
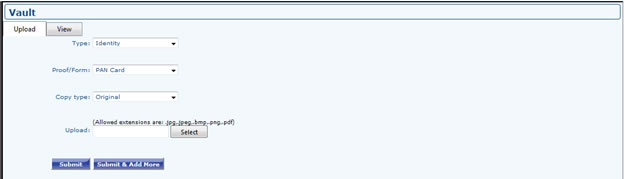
How to add customer proof?
- Go to Profile Dashboard >> Proof >> Vault Proof >> Upload. Now select the Type, Proof/form, Copy type and upload the file then submit. The uploading document should be in proper way.
How to know the product Order details?
- Go to product order >> order management. Select the order types then if you have any approved/pending order you get the details.
How to add customer income details?
- Go to Finance Profile >> Income Details. Click edit and enter the amount for required fields and click to Submit. Entry can be edited anytime by Edit button. Your Tax Slab value appears once you have entered your income details and also selected your gender and filled the Age properly in your Profile. Then According to your income, age & gender it will display in which slab you are.

How to add customer expense details?
- Go to Finance >> Expense Details. Click edit and enter the amount for required fields and click to save. Entry can be edited anytime by Edit button. Insurance Premium is coming from Insurance Section, MF SIP value is coming from Monthly value of registered SIPs, Loan EMI value comes from Loan Section Monthly EMI Value and Recurring Deposit values comes from Fixed Income Recurring Deposit Entry.

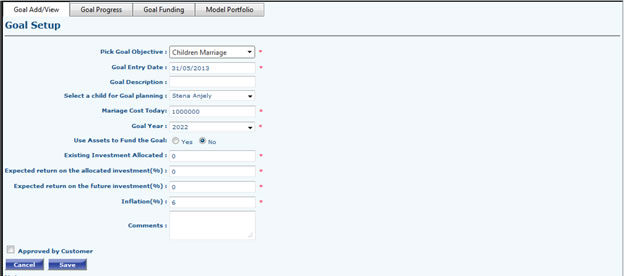
How to set the goal details?
- Go to Financial planning >> Goal planning >> Goal setup. Fill the required fields then save.
How to check the goal list details?
- Go to Financial planning >> Goal planning >> Goal List.

How to setup life insurance?
- Add Life Insurance: In first page select Portfolio Name (if you have other portfolio), Asset Category (Eg. Endowment Policy, Money back Policy, Term Policy, ULIP, Whole life Policy), Policy No., Now click to Submit. It will take you to next page.
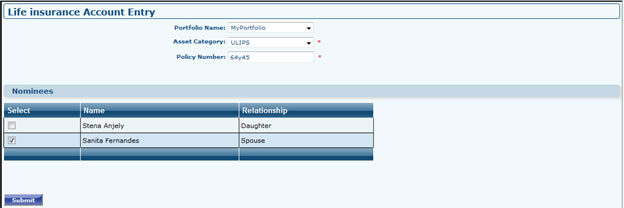
Now Fill required fields and submit.

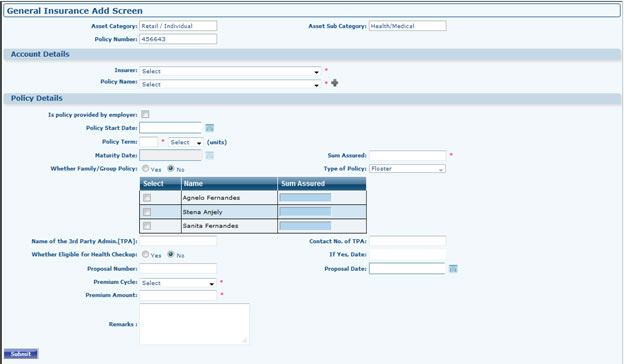
How to setup general insurance?
- Add General Insurance: Select Asset Category, then Select Asset Sub Category, fill policy number. It will take you to next page.
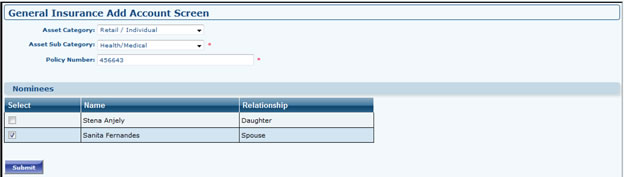
Fill the required field and submit the form.
How to add customer EQ account?
- Go to Portfolio Dashboard >> Equity >> Add Equity Account. Select Portfolio (if any), Broker Code from dropdown, Fill equity trade account number, Account starting date, brokerage % for delivery & speculative and other charges and click to Submit. Same can be Viewed/Edited from View Equity Account.

How to add customer equity details?
- Go to Portfolio Dashboard >> Equity >> Add Equity Transaction. Select Portfolio (if any), Type some letters of scrip name in "Scrip Particulars" field a dropdown will open select scrip (Please don't type scrip manually), Select transaction mode, Transaction Type (Purchase, Sell) , Exchange (BSE/NSE), Trade Account Number (Select trade account number from dropdown, in case you have not added trade account earlier click to Add Trade button to Add Trade Account), Ticker field will be automatically filled as soon as you selected Scrip Particulars, Select transaction date, Fill Rate, No. of shares (Broker field will be automatically filled as soon as you will select trade account number so no need to fill it manually), Brokerage, Other Charges after this click to Calculate Button Other Fields (Service Tax, STT, Rate inclusive of Brokerage, Trade consideration Total) will be auto-filled after calculation. After filling all fields click to submit.

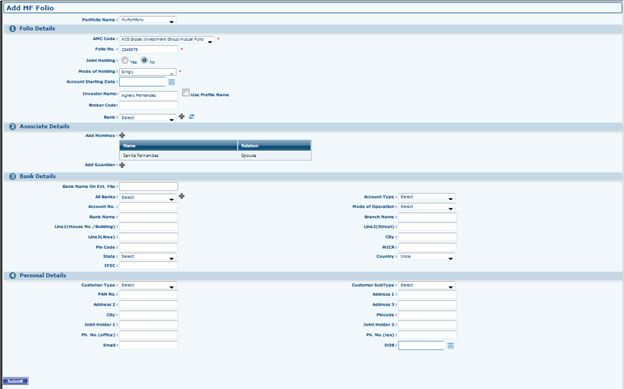
How to add Mutual fund folio?
- Go to Portfolio Dashboard >> MF >> Add MF Folio. Fill the required fields and Submit
How to add customer Mutual fund details?
- Go to Portfolio Dashboard >> MF >> Add MF Transaction. Select Portfolio (if any) , Select scheme name from scheme dropdown, select the scheme name, Select Scheme & Category, Select Transaction Type (Buy, Sell, SIP, SWP, Switch, Dividend Reinvestment, STP, Dividend Payout ), Select Folio Number (If you do not have folio number then click to Add MF Folio button and add a new Folio Number), Select Transaction Date, NAV field will be filled by the price according to selected Date, Click to "Use NAV" button price will be auto-filled, then fill other fields and click to Submit.

How to setup systematic Transactions?
- Go to Assets >> MF >> Register Systematic Schemes. Then fill the required fields and then submit the form

How to add customer fixed income details?
- Go to Portfolio Dashboard >> Fixed Income >> Add Fixed Income. Select Portfolio (If Any), Select Asset Category, Fill Certificate Number, If Account is Joint holding select the associate member from Join Holders Grid, Select the nominee from Grid (Make sure you have associate members then only Joint holders/Nominee Grid will appear). After Filling all the fields it will take you to next page.

Fill All Required Fields and Submit. Submitted record can be Viewed / Edited from Fixed Income Grid.

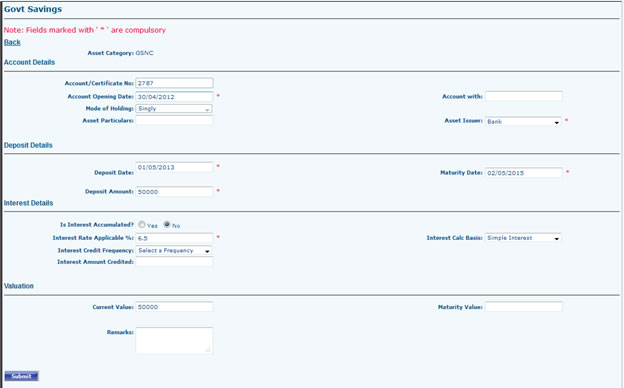
How to add customer govt. details?
- Go to Portfolio Dashboard >> Govt. Savings >> Add Govt. Savings. Select Portfolio (If Any), Select Asset Category, Fill Account Number, If Account is Joint holding select the associate member from Join Holders Grid, Select the nominee from Grid (Make sure you have associate members then only Joint holders/Nominee Grid will appear). After Filling all the fields it will take you to next page

Fill All Required Fields and Submit. Submitted record can be Viewed / Edited from Govt Saving Grid.
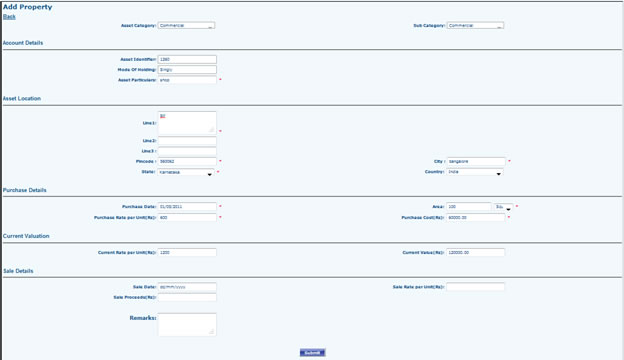
How to add customer property details?
- Go to Portfolio Dashboard >> Property >> Add Property Select Portfolio (If Any), Select Asset Category, Sub Category, Asset Identifier, If Account is Joint holding select the associate member from Join Holders Grid, Select the nominee from Grid (Make sure you have associate members then only Joint holders/Nominee Grid will appear). After Filling all the fields it will take you to next page.
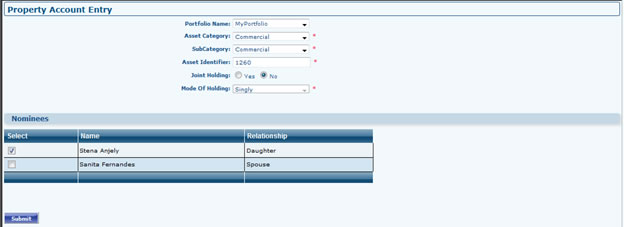
Fill All Required Fields and Submit. Submitted record can be Viewed / Edited from Property Grid.
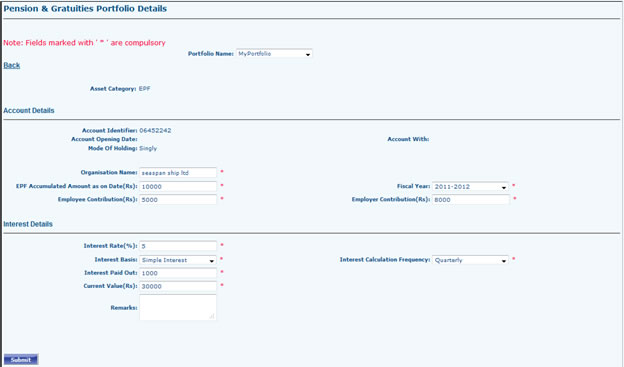
How to add customer Pension and gratuities?
- Go to Portfolio Dashboard >> Pension And Gratuities >> Add Pension And Gratuities Select Portfolio (If Any), Select Asset Category, Fill Account Number, Account Source, If Account is Joint holding select the associate member from Join Holders Grid, Select the nominee from Grid (Make sure you have associate members then only Joint holders/Nominee Grid will appear). After Filling all the fields it will take you to next page.

Fill All Required Fields and Submit. Submitted record can be Viewed / Edited from Pension And Gratuities Grid.
How to add customer personal items details?
- Go to Portfolio Dashboard >> Personal Asset >> Add Personal AssetsSelect Portfolio Name (If Any), Select Category (Automobile, Furniture), Sub Category, Quantity etc and click to Submit. Submitted record can be Viewed / Edited from View Personal Asset Grid.

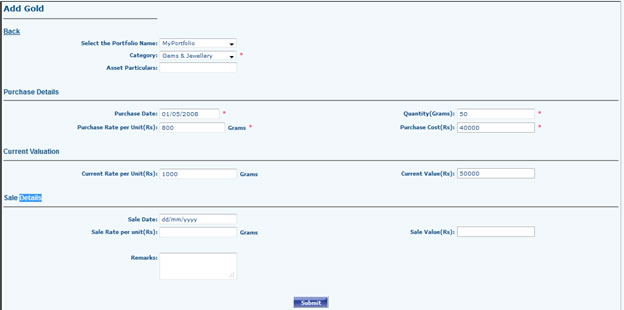
How to add customer gold details?
- Go to Portfolio Dashboard >> Gold Asset >> Add Gold Assets Select Portfolio (If Any), Category, Asset Particulars etc. And Submit. Submitted Records can be Viewed / Edited from View Gold Asset Grid.
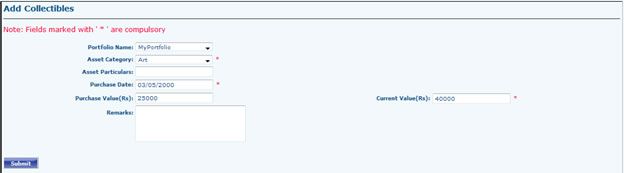
How to add customer collectibles?
- Go to Portfolio Dashboard >> Collectibles >> Add Collectibles Select Portfolio (If Any), Select Asset Category (Art, Curios, Decorative, Plate Glasses, Collectibles Other, Personal, Yatch), Fill Asset Particulars & Fill other Details and Submit. Submitted records can be Viewed / Edited from Collectibles Grid.
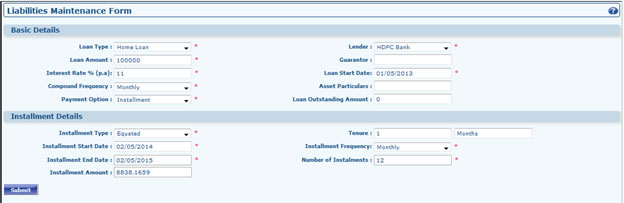
How to add customer liabilities?
- Go to Liability Dashboard >> Add Liability. Select Loan Type (Home Loan, Auto Loan, Loan Against Property, Loan Against Shares, Personal Loan, Educational Loan, Business Loan, Loan Against Business Property), Select Lender, Fill Loan Amount, Interest Rate, Fill Guarantor Name and other Information and Click to Submit. If payment option is Lump sum then Installment Details Section won't be visible. Loan Outstanding Amount field is an automated field. After adding any entry can be Viewed or Edited from Liability Grid.
How to generate and save the reports?
- Go to reports and select which report you want (MF, FP, Equity, Multi Assert) and select the portfolio, report type, Date. Select type in which format you want to see the report. If you want to save the reports select word or PDF
|